 First I had to take the whole thing apart and clean the fabric (although it was dusty, the fabric was still all intact. So I decided to leave it as an undercoat, so to speak, instead of trying to remove it all). Once all the metal was cleaned up, I sprayed it all down with some silver spray paint. You might think that it looks a little like chrome. That, of course, was the idea!
Once all the metal was repainted, I started on the upholstery. I had to make all the piping from scratch because, for some odd reason, no one seems to sell bright orange piping in canvas. Bright orange? Has she gone mad or just color blind? Wait and see... After careful measuring, making paper templates and trial and error, I was able to start assembling the fabric covers. The arm rests needed all new padding, so I manipulated some polyfoam to fit over the metal covers.
After careful measuring, making paper templates and trial and error, I was able to start assembling the fabric covers. The arm rests needed all new padding, so I manipulated some polyfoam to fit over the metal covers. 
Unlike the rocking chair face lift, this project required a lot of sewing, both on the machine and by hand. I would have loved to use plygrip again, but the frame is metal and I would not have been able to tack the plygrip down to anything. As it is, the handstitching on the seams went pretty quickly and looked just as nice. Hmmmm, orange and black? Wonder where this is heading...
Once all the seams were secure, I started to reassemble the chair. This went a bit slower then the disassembly, and I had to take things apart and put them back together again more than once. Lesson learned: take pictures of EVERY PART before you deconstruct!
 Once all the bolts were tightened and the chair pads reattached, the chair was finished.
And the best part, of course, is that it is a Harley Davidson chair! I found it funny that the most expensive part of this upcycle was the Harley patch for the back. 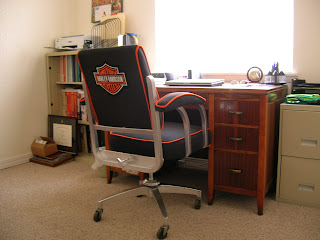

Beat up old office chair: $3
Harley Davidson patch: $17
Fabric, piping and foam: $28
Awesome, one-of-a-kind chair for my hubby: Priceless!
I wanted to have the chair done for his birthday, but was a day late. However, I did have his originally planned birthday present done and wrapped with a day to spare! This was my first real attempt at embroidery. Brian already has an awesome embroidered Harley shirt, so I decided to go with the Mustang on this one. I'm pretty happy with how it turned out, but I am not a big fan of embroidery and probably won't attempt anything else again soon.


