Saturday, July 30, 2011

Another upcycle project!

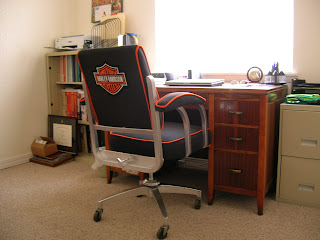
You may recall me mentioning a while ago that I was still looking for a chair to go with Brian's awesome new desk. I have been trolling Craig's List and Freecycle, hoping to stumble across something that would go with the 100 year old desk. While Brian didn't mind using my old kitchen chair, I have been wanting to get the trestle table posted on Craig's List to sell, and couldn't really do that until he had a chair. So last week I stopped by the furniture sale on base and found this sturdy, though kinda pathetic, office chair. I knew it wasn't exactly what Brian had in mind, but I had an idea that I thought would please him.

First I had to take the whole thing apart and clean the fabric (although it was dusty, the fabric was still all intact. So I decided to leave it as an undercoat, so to speak, instead of trying to remove it all). Once all the metal was cleaned up, I sprayed it all down with some silver spray paint. You might think that it looks a little like chrome. That, of course, was the idea!


Once all the metal was repainted, I started on the upholstery. I had to make all the piping from scratch because, for some odd reason, no one seems to sell bright orange piping in canvas. Bright orange? Has she gone mad or just color blind? Wait and see...After careful measuring, making paper templates and trial and error, I was able to start assembling the fabric covers. The arm rests needed all new padding, so I manipulated some polyfoam to fit over the metal covers.


Unlike the rocking chair face lift, this project required a lot of sewing, both on the machine and by hand. I would have loved to use plygrip again, but the frame is metal and I would not have been able to tack the plygrip down to anything. As it is, the handstitching on the seams went pretty quickly and looked just as nice. Hmmmm, orange and black? Wonder where this is heading...

Once all the seams were secure, I started to reassemble the chair. This went a bit slower then the disassembly, and I had to take things apart and put them back together again more than once. Lesson learned: take pictures of EVERY PART before you deconstruct!

Once all the bolts were tightened and the chair pads reattached, the chair was finished.


And the best part, of course, is that it is a Harley Davidson chair! I found it funny that the most expensive part of this upcycle was the Harley patch for the back.


Beat up old office chair: $3
Harley Davidson patch: $17
Fabric, piping and foam: $28
Awesome, one-of-a-kind chair for my hubby: Priceless!


I wanted to have the chair done for his birthday, but was a day late. However, I did have his originally planned birthday present done and wrapped with a day to spare!This was my first real attempt at embroidery. Brian already has an awesome embroidered Harley shirt, so I decided to go with the Mustang on this one. I'm pretty happy with how it turned out, but I am not a big fan of embroidery and probably won't attempt anything else again soon.

Sunday, July 10, 2011

A Busy July

What a wonderfully fun and busy month so far! The kids are here for two weeks and, just like in Savannah, I always seem to see and do more when folks are visiting! Unfortunately I haven't brought my camera to all the festivities (missed out on pictures of El Paso's Downtown Streetfest, the Old Ironsides Museum, and Wet n' Wild waterpark), but here are a few pics I have snapped.

I got to see my first Diablos baseball game! I haven't been to a baseball game in ages, and even though Brian wouldn't let me bring my knitting for the boring parts I still had a great time.

And there were fireworks!! We could actually see the fireworks show from the house the night before, but it was more fun to watch in the park after the game.


When the weather is hot, there's no better way to cool down than fresh, homemade ice cream!


I was super excited that K was interested in crafting during her visit. The first project: a teddy bear! This was a pretty ambitious first step and she did awesome.

After the bear she picked out some cheerful pink Batik and made this sling purse.


Of course, I can't spend that much time in my craft room without something to show for it myself. So I made a new bear out of some lingering fur scraps. I know it looks like he doesn't have a nose or mouth, but he does I promise!


I was also feeling the urge for a new purse, so I made this frilly little messenger bag with an adjustable strap. Once the purse was finished, I decided to whip up a matching wallet.


The wallet actually turned out a lot larger than expected. It's almost a clutch purse itself! I'm not sure how this will work out exactly, but I'll give it a shot for a while. (I used a combination of this and this tutorial to make the clutch, in case you were wondering.)

Sunday, June 26, 2011

Someone was busy in the kitchen!

Brian took a nice long motorcycle ride with some of the helicopter pilots on Saturday, and I took advantage of the time alone to whip up a bunch of goodies in the kitchen!

I started with some simple boxed pudding for Brian's lunches this week. I love my reusable Gladware containers, especially the handy 1/2 cup, single serving size ones!

Then I moved on to a big batch of yogurt. I used the "keep it warm in a crock pot" method with great results at Dad's last month, so I repeated that here. I found out, however, that my crock pot's "warm" setting keeps the pot about 30 degrees warmer than Dad's! The yogurt is still tasty, though, so no harm.

And, of course, if I made yogurt you know I'd have to make granola to go with it! I used the wonderful Savannah Bee Company Orange Blossom Honey that Robyn gave me and it adds a nice flavor to the snack.


Last week I used my bread machine's dough cycle to whip up a single loaf of wheat bread. I prefer the way the bread comes out when you bake it in the over instead of letting the bread machine bake it, but it was still a little on the dense side. So this time I used Mom's old wheat bread recipe and made the whole thing from scratch. Oh, the smell of fresh baked bread! This loaf has a great consistency, and requires very little kneading. Yum!


And, thanks to the Saporita's for this long ago idea: home made ice cream sandwiches! The grocery store I went to Saturday morning unfortunately did not have chocolate graham crackers, so I had to make due with honey flavored. Spread a little Cool Whip inbetween the crackers and you have a home made ice cream sandwich. I did learn, this time, that they are much easier to wrap if you let them sit in the freezed for about an hour so the whipped cream and harden a bit. I'll be keeping my eyes open for the chocolate crackers for the next batch...

Thursday, June 23, 2011

Oh, the cuteness!

I had a surprise visitor in my backyard this morning. As I was watering the herbs and veggies, I heard a soft scraping noise coming from the back wall. Being in new and somewhat unfamiliar lands, I was a bit wary as to what might be causing the noise.

After staring long and hard, I finally located the source: this adorable little turtle!
He was oh so tiny, but very brave. It only took a moment of being handled before he stuck his little head back out and started walking around on my hand. I can only guess that he's a land turtle, since there aren't any lake, rivers, streams, ponds, puddles or leaky faucets around. Any guesses on what kind of turtle he is? I emailed the University of Texas at Austin with a picture, but haven't heard back yet. Update: according to UTA, this is an ornate box turtle.I tried to keep him safely in my herb garden containers until I could establish what kind of turtle he was and where would be the best place to release him. But he managed to escape the garden and is now off on his next adventure! Kinda makes me want to knit a turtle, if I could just find a pattern...


And, just because it's been a few days since I've posted pictures of the girls, here they are keeping me company while I search for jobs. Mo is getting so big so fast that it's hard for me to believe that she's less than 5 months old. Hopefully she won't get as big as Harley!


Tuesday, June 21, 2011

Focaccia bread!

One of our wedding presents was a Panini press. I experimented a little before leaving Savannah, to moderate success. You would think there's not much to it: bread, filling, press, eat. But the trick is getting a bread that will grill up nicely, filling that will stay in place and heat well, and just enough moisture to flavor the panini without getting soupy. Fresh tomatoes are a no-no, as they just get squishy and slide out. Goat cheese or mozzarella are better than sliced deli cheese. Little things like that. I was thinking about what to make for dinners this week, and decided it was time to give the panini press another go. But instead of buying some bread, I whipped up my very first focaccia bread!

Unfortunately, my potter's instinct took over and I kneaded the dough the way I used to handle clay. This is a bad thing because when you're working clay you are actually trying to get the air out of the clay. When kneading bread, you want to work air into it! Live and learn for next time.

Ingredients:
1 C wrist temperature water
1.5 tsp active dry yeast
1 tsp sugar
1 tsp salt
about 3.5 C flour
dried herbs (I used Italian seasoning)
olive oil (for bowl and brushing on top of dough)

Place the water in a medium sized bowl and sprinkle in the yeast. Let stand for 5 minutes. Add the sugar and salt, then stir until everything dissolves.

Add 3 cups of flour, one at a time, stirring enthusiastically with a whisk. Switch to a wooden spoon then your hands as it thickens. Knead the dough in the bowl for a few minutes, adding the herbs and up to a half cup extra of flour to combat stickiness. When the dough is smooth, oil both the bowl and the top surface of the dough. Cover with a clean towel and let rise in a warm place for about an hour, or until the dough has doubled in size.

Punch down the dough and transfer to a clean, floured surface. Adding small amounts of extra flour as needed, knead the dough for about 5 - 8 minutes (until it is smooth and elastic). for the dough into a ball and roll into a 10 - 12 inch diameter circle. Let it rise for about 10 minutes while the oven preheats to 400.

Transfer dough to a lightly oiled baking tray and brush the surface of the dough with a little bit of oil and sprinkle more dried herbs on top. Bake for 20 to 30 minutes or until lightly browned.

Friday, June 17, 2011

What's old becomes new again

I am really truly home now: my craft room is unpacked and set up!! The table is in place, books are on the shelves, and the file cabinets are nestled in the closet. Now I just have to decide which project to start on first. Perhaps something for Brian's birthday...


Just after we got back from Georgia, Brian finally succeeded in getting the Internet connected. We didn't have a desk when the tech came, so Brian improvised with several of my bookcase crates and boards. It was a good short-term fix, but not very comfortable or attractive (not to mention that he was holding my crate hostage and I couldn't get my craft room completed).


To remedy this situation, I started trolling Craigslist and Freecycle to find him a desk. After only a few days, I came across this beat up wooden desk.


I had never heard of Leopold Desk Company, but Brian did a little research (more on that later).


Though it needed a little love, I could tell it had potential. It was all real wood and very sturdy. I dished out $25, loaded it in the Durango and headed home. That night we stopped by Lowe's and picked up sand paper, steel wool and Minwax stain/polyurethane.


First step was removing all the original hardware and sanding. Lots and lots of sanding!


Once I got the old stain off the top, legs and drawer fronts, it was time to test out the stain. We were both a little skeptical of the stain/polyurethane combo. I mean, could it really work as well as the two separate products? The first coat went on and looked promising. A benefit of living in the desert: I didn't have to wait the full 6 hours between coats!


Minwax did not let us down. The new finish looks great, just as good as I hoped. I am so pleased with how it turned out. Now we just need to find an office chair that will compliment it.


Now, a bit about that research Brian did. Apparently the Leopold Desk Company made desks under that name by hand from 1900 to 1937, which makes this desk between 74 and 111 years old. The only thing that is missing is the key to lock the drawers, and we'll be sending the lock off to get new keys fabricated to match. After poking around a bit more, Brian found that desks similar to this one are running around $500. And I only dropped $25 on it. Score!!

Thursday, June 16, 2011

How to make an upholstered headboard

This little step-by-step description may seem really simple. That's because it is! I didn't have a pattern or any other kind of guild to go by. Just measure how wide the bed frame is and how you want your headboard to be. Then away you go!


It helps if you (or a good friend) have a workshop or some woodworking tools handy. I could have done this with just my simple battery operated hand tools (if they weren't already in El Paso), but Bob's fully stocked workshop made it that much easier!


First, we picked up a piece of 3/4" plywood from Lowe's. If you don't have a saw to cut it down, the folks at the hardware store can usually make simple cuts for you. Just ask.


Then we got a wee bit fancy, just because Bob has so many fun tools to play with. We routered the edges to round them off and added a 1/2" strip of wood along the top to account for the floorboard and raise the headboard a bit away from the wall once it's attached to the bed. We also drilled holes for the bolts that will attach the headboard to the frame.


Once I got the cut plywood back home, I had to seam the fabric together. The headboard was 60" wide, but the fabric was only 56" wide. If the fabric did not have a directional print, I could have just turned it sideways and used a 60"+ length. But the toile would have looked silly sideways. It took a little patience to get the pattern to line up at the seam, but it is worth it to take your time and get it lined up as close as possible (especially if you're as much of a perfectionist as I am!).


To give the headboard that puffy, upholstered look, I used 3 different quilt battings layered on top of each other and wrapped about to the back of the wood. If you wanted to spend a bit more, you could get some foam. But the batting worked just fine. Wrap it over the edges and staple it to the back to hold it in place. Because the headboard will be up against a wall, the backside does not have to be pretty. Just make sure that the edges are smooth and not too puckered from pulling it over the wood.


Once the batting is tacked in place, do the same with the fabric. I started by tacking the top in place and stretching it down the front to the bottom. Again, the bottom part will be hidden by the mattress and box spring, so it doesn't have to be pretty. Just fold the fabric under itself before you tack it down so it won't fray. Then wrap the sides around and staple it to the back.


Now grab a bunch of upholstery tacks and mark off the pattern that you want. I did offset lines at 10" spacing to give it a good, puffy look. Be sure to buy more tacks than you will actually need, as they are prone to bending when you try to hammer them in. Also, I'd suggest using a rubber mallet if you have one (if not, place some extra fabric over the tacks before hammering so they don't get scuffed).


For the last step, use bolts, washers and nuts to attach the headboard to the bed frame. I used 1/4" bolts that were 1 1/4" long. The washers help protect the plywood from strain.


Push the bed back against the wall (making sure the bolts don't touch the wall) and you are finished!